back to probe overview

Rakes

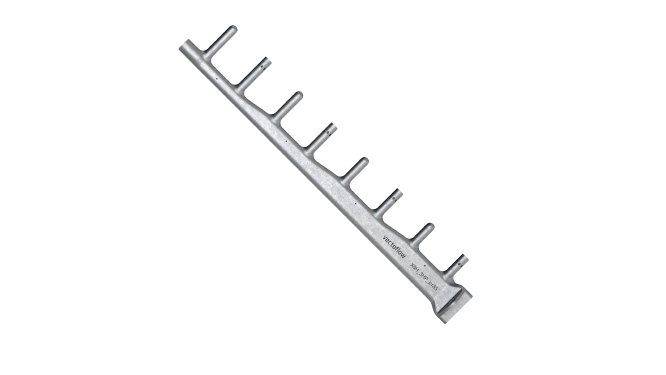
Rakes combine several measuring heads in one probe and are therefore ideal for measuring flow variables at several measuring points simultaneously. Rakes can be equipped with the following measuring heads:

  • 3-, 4-, 5-, 7-, 14-hole head,
  • Pitot head,
  • keel total pressure head,
  • Kiel total temperature head,
  • Preston Kopf,
  • Prandtl head.

Gallery

Product Details

By combining different probe heads such as multi-hole, kiel (total pressure and total temperature),preston and pitot heads within a single rake or probe, customers benefit from enhanced spatial resolution. Our innovative additive manufacturing process offers unparalleled geometric flexibility, allowing rakes to be precisely tailored to specific applications or seamlessly integrated into other components while ensuring exceptional mechanical strength.
Vectoflow customises rake designs according to customer specifications, leveraging Finite Element Method (FEM) simulations for optimal performance.
Vectoflow develops the design of the measuring rakes based on customer requirements and supports this with FEM & CFD simulations. Vectoflow also carries out a wide range of tests to determine and verify properties such as roughness, geometric accuracy, crack formation (X-ray or FPI examinations, blue light scan), and natural frequencies (natural frequencies can be controlled by optimizing the internal structure).
The measuring rakes are also calibrated in Vectoflow’s own calibration channels.

Specifications

Integrable probe heads

3-, 4-, 5-, 7-, 14-hole heads, Preston head, Kiel head (pressure & temperature), Pitot head, Prandtl head

Length Max. for one-piece design

280 mm, other sizes possible through hybrid design

Tip diameter min.

1,2mm (default 3mm)

Material

Stainless steel, titanium, Inconel, aluminum and much more.

Interface/Installation

according to customer requirements

Connections

according to customer requirements

Reference

according to customer requirements

Temperature range

up to 1000 ° C

Measuring accuracy angle

<±1°

Angle measuring range

± 160° (depending on probe head)

Speed ​​measurement range

Mach 0,012 (4 m/s ISA) - Mach 0,99 (337 m/s ISA)

Measuring accuracy speed

<1 m/s or <1% FS, whichever is greater

Frequency

up to 50 Hz (depending on probe geometry, frequency calibration possible)

Possible features

Pt100, thermocouple, strain gauge, integrated data acquisition device (smart rake)

Our areas of application

Our industry solutions

Aerospace

Learn More

Automotive

Learn More

Wind power

Learn More

Research

Learn More

Turbomachinery

Learn More

Flow probes

Trusted by Industry Leaders. Customers We Serve:
Individual request
Interested? Contact Us to Discuss Your Needs!

Contact

Zeppelinstr. 16
82205 Gilching
Germany
+49 89 124149570Email info@vectoflow.de
Vectoflow GmbH Tüv ​​Seal
© Copyright 2024 - Vectoflow GmbH - All Rights Reserved
chevron-leftchevron-right
linkedin facebook Pinterest youtube rss Twitter instagram facebook-Blank rss blank LinkedIn-blank Pinterest youtube Twitter instagram